Phase2 UI: Instructions for RISE
Introduction
RISE observations are prepared and 'sequenced' just like any other imaging camera at the LT. We therefore suggest users read the IO:O Phase 2 UI instructions before preparing their RISE observations. Here we only address the few features that are specific to RISE.
Creating a Basic Sequence
See the IO:O Phase 2 UI instructions page for notes on how to set up a basic imaging sequence with the phase2UI Wizard.
Use the generic Wizard for Multicolour Photometry in exactly the same way as you would with IO:O. Make sure you set the Rotator Aligned to RISE, and the Instrument to RISE.
When creating a RISE config, remember that RISE contains only a single filter "setting". Also, while 1x1 and 2x2 binning are both available, we recommend 2x2 binning be used for all RISE observing due to the better linearity and cycle time in this mode. Please also be wary of saturation on bright targets. We STRONGLY RECOMMEND that test observations be secured with different focus settings before embarking on long observing groups on bright targets (some guidelines are available on the RISE homepage).
The wizard should create a sequence that looks something like this:
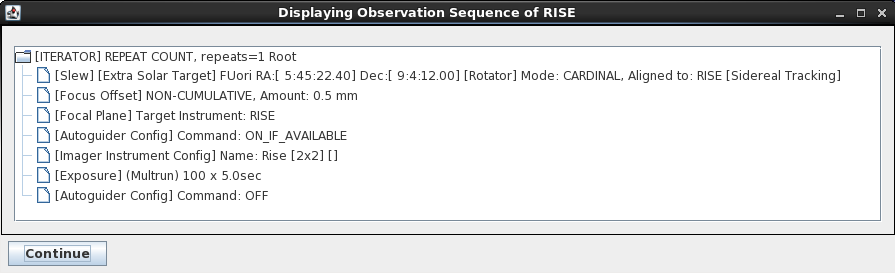
A simple RISE sequence. In this case the telescope is defocused before 100 5-second images are obtained. The autoguider is switched on only if a guide star is available. (Click to enlarge.)
The above sequence contains the following steps:
- SLEW: Slew to target. Only one target is allowed per group.
- FOCUS OFFSET: Defocus the telescope. We recommend +ve values. Only appears in sequence if non-zero.
- FOCAL PLANE: set the instrument aperture.
- AUTOGUIDER CONFIG: Optionally engage the autoguider.
- INSTRUMENT CONFIG: Configure the instrument accordingly.
- EXPOSE: Take data.
- AUTOGUIDER CONFIG: Switch the autoguider off (if used).
Rotator Setting
This parameter sets how the mechanical rotator axis of the telescope (the rotation angle of the cassegrain) is set and thus how the image is oriented on sky. As with IO:O, the two options available are AUTOMATIC or MANUAL. Be sure to select RISE from the instrument drop down list after specifying this parameter.
- AUTOMATIC orients the cassegrain derotator so that images will be aligned on one of the cardinal sky orientations: N, E, S or W. The angle is chosen by the system to give the longest available observation duration without encountering the cassegrain axis limits. (Note that a previous software version oriented all RISE fields as NW, NE, SE, SW. This is no longer the case and proper cardinal field rotations are used.)
- MANUAL allows users to explicitly set the field orientation, either as a sky position angle or as the mechanical mount angle of the cassegrain derotator. With MANUAL selected, after creating an exposure, simply click "Continue" and the wizard will take you to the rotator specification screen.
In most cases we advise leaving the rotator set to automatic (CARDINAL in the above sequence), unless a sequence is longer than a couple of hours in duration. In such cases a specific angle may need to be defined so that the cassegrain rotator limit is not reached before the end of the observation. For a detailed discussion, please read the Cassegrain Rotator guide and/or contact LT Phase 2 support for assistance.
Using the Sequence Builder
There are no RISE specific considerations. Please follow guidance on the Phase2 UI User Instructions for IO:O pages except of course that when nominating an instrument from a drop-down list, such as the FOCAL PLANE command, you must select RISE.