Phase2 UI: Instructions for MOPTOP
Introduction
MOPTOP observations are usually prepared or "sequenced" like any other imaging observations. We suggest users therefore read the Phase2 UI User Instructions for IO:O prior to preparing MOPTOP observations. On this page we only address the few features specific to MOPTOP.
Using the Wizard
When creating new groups, it's best to select the Wizard for Polarimetry (see right). This looks just like the generic imaging wizard except that it offers only MOPTOP and does not allow you to choose the on-sky orientation. As with IO:O, users should:
- choose a target (or define a new one)
- set the autoguider (Yes/Off/On-If-Available)
- apply a focus offset if the target is very bright (discussed further below)
- create an instrument configuration (if necessary)
- add an observation to the list by selecting an exposure time and clicking on Add to Observation List
Exposure Time
MOPTOP's rotator always has to make a complete number of rotations; it cannot do a partial rotation to exactly match the integration time required. The time spent making these rotations is therefore different to the integration time you want, and we call it the "duration".
Full details describing this, and its implications on the exposure time to enter in the Phase2UI, are given in the main MOPTOP page. Suffice it to say that you have to enter a duration that is longer than the integration time you want, to ensure that the shutter is open for at least the that integration time. You will end up with a little more integration that you originally wanted, but it's better than not getting enough.
An equation to quickly calculate the duration time td, given the integration time ti and rotator period P, is:
| attribute | speed mode | |
|---|---|---|
| fast | slow | rotation period P(s) | 8 | 80 | frame exposure time te(s) |
0.4 | 4.0 |
where:
- ⌈⌉ = notation for the "ceiling" function that rounds up to the nearest integer
- ti(s) = integration time required
- P(s) = rotation period (take value from table)
- te(s) = exposure time of each frame (take value from table)
For example, a 200s integration time in slow mode means we have ti = 200s, and requires we take P = 80s & te = 4s, to give td = 320s. So we enter 320s, not 200s, into the Duration field of the Phase2UI to ensure we get at least 200s of integration time. At this stage the (Create) Polarimetry Sequence Editor should look like this:

The wizard then creates a simple sequence that looks like this when you click on "Display Observation Sequence":

The sequence consists of:
- SLEW: slew to the target
- FOCAL PLANE: sets the Focal plane for MOPTOP observations
- AUTOGUIDER CONFIG: If requested, acquire a guide star and switch on the autoguider
- POLARIMETRY INSTRUMENT CONFIG: Configure the instrument
- EXPOSE: Obtain sequence of images
- AUTOGUIDER CONFIG: Switch the autoguider off (if it was used)
Cassegrain Rotator Setting
Your science observations and the unpolarized calibrator stars that we routinely observe for all users (see Calibrations below) must all be observed at the same physical cassegrain derotator position, because the instrumental polarization signature depends on the physical alignment of the telescope's tertiary fold mirror. By always observing at the same mechanical mount position, this alignment remains consistent between data and calibrator.
Though observations can be obtained with the cassegrain at any orientation, we recommend that all MOPTOP observations be performed at a mount angle of zero. Note that the MOPTOP wizard does not offer a choice of rotator angles. This does mean that each observation will be observed at a different sky position angle; but this is more convenient than having to carefully match standards to the orientation in each science frame. If the Wizard is used to prepare your MOPTOP observations, the cassegrain mount angle will automatically be set correctly to zero. See the MOPTOP web page for further details.
Autoguiding & Defocus
Follow the guidance on the Phase2 UI User Instructions for IO:O pages.
Please end your observation sequence with "Non-cumulative defocus = 0" so you leave the telescope in focus for the next observer.
Calibrations
Two sets of calibrators are required for MOPTOP data:
- Zero polarization stars are used to correct both science frames and standards for the polarization signal imprinted by the telescope, principally because the beam is folded. As discussed earlier, these zero calibrators must be obtained at the same cassegrain mount angle as the data being corrected.
- As with any polarimeter, there will be some degree of depolarization caused by scattering in the telescope optics. Known polarized stars are thus used to calibrate the absolute polarization.
Users may of course collect their own standard star observations. However, we are running a public program of standards, the data from which are available to all users. These are all observed at a mount angle of zero. The public standards star observations are available from the (Data Archive) under proposal ID "MopStand". Recent standards are also available from the Recent Data page.
Using the Manual Sequence Editor

If you want to build your MOPTOP sequences from scratch instead of using the Wizard, you use the Manual Sequence Editor (see right).
There are relatively few MOPTOP-specific considerations, so as before, for the most part please follow the guidelines in the Phase2 UI User Instructions for IO:O. Obviously, when nominating an instrument from a drop-down list, such as the FOCAL PLANE command, MOPTOP should be selected.
MOPTOP-specific considerations are below.
Exposure Time
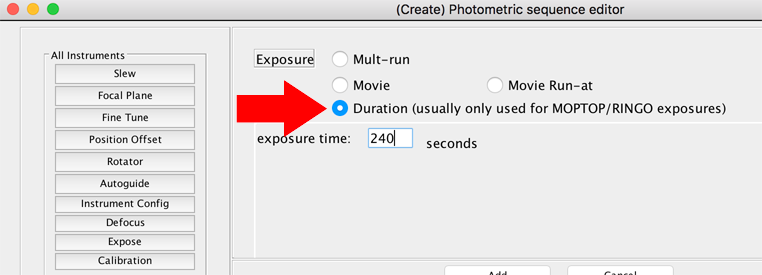
In the "Expose" panel, select the Duration, not the Multrun setting (see below). As mentioned above and in the MOPTOP main page, the duration is the total time spent on target as a result of the minimum integer number of rotations required to cover the required integration time.
If you need to change the duration of your MOPTOP observation, in the Editing Observations Sequence window, highlight the "[Exposure](Duration)" line in the sequence and click on Edit. Always leave the "Exposure" set to "Duration", and simply update the exposure time, remembering that this is the total time spent on your target:
Cassegrain Rotator Setting
Though you can set any rotator mode you wish for your specific purposes we recommend always using MOUNT=0 as the rotator configuration for MOPTOP. See the Cassegrain Rotator Setting discussion above for further details.