Phase2 UI "Getting started" Tutorial:
creating a simple multicolour photometry group
This tutorial is an example showing you how to create a simple observing group that will monitor an object nightly, obtaining exposures in R and I band filters. It describes one method of using the GUI - there are other ways of navigating around from page to page and orders that you can do tasks in to achieve the same result. You will discover these with use!
Startup & login
The Phase2UI is available as a Java Webstart application and as a standalone downloadable application for Apple OS X users. We recommend that users try to use the Webstart deployment as this version automatically updates when changes are made to the client and/or server. However, if Webstart is unavailable on your OS X machine, the standalone app can be downloaded from the Phase 2 homepage, unzipped into your /Applications folder and run directly. When the standalone client is out of date, a dialog box will pop up and inform you to download the new version.
To use the Webstart version, click the button on the Phase2 page. If this is your first time using the application, or if a new version has been released since your last use, the most up to date version will be downloaded automatically. With most browsers the application will then start straight away. However, some browsers will only download the "jnlp" file to your machine and you will need to execute that file (e.g. double-click on it). When the software starts it will require you to confirm that you trust the certificate that signs the application:
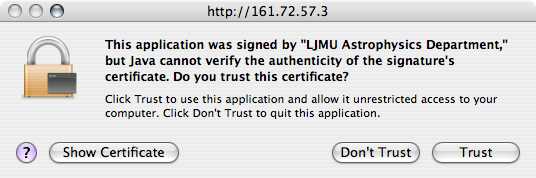
The login page should then appear. You should have been supplied with a Phase2UI username and password by LT Phase 2 Support. (Note that this is different to your data archive username and password.)

User information
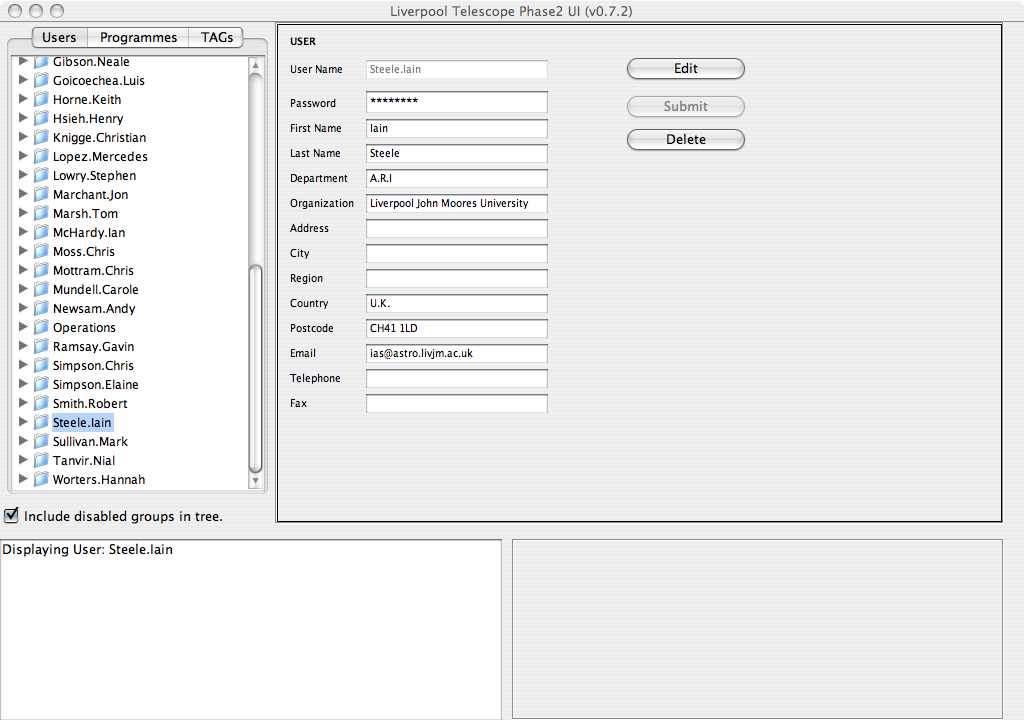
The main Phase2UI Gui window will now open. The left hand panel is a tree, with three different top level views (Users, Programmes and TAGs). The tree will only be populated with entries that you have access to - you will therefore see only one entry under Users for example. Click on your username. The right hand panel will provide some basic details about you which you may wish to update. In particular we recommend you update your password. Note that you will need to share this password with your collaborators if you want them also to have access to the proposals under your control, so don't use a password you also use for personal logins on other systems:
 (Click image to enlarge)
Proposal Information
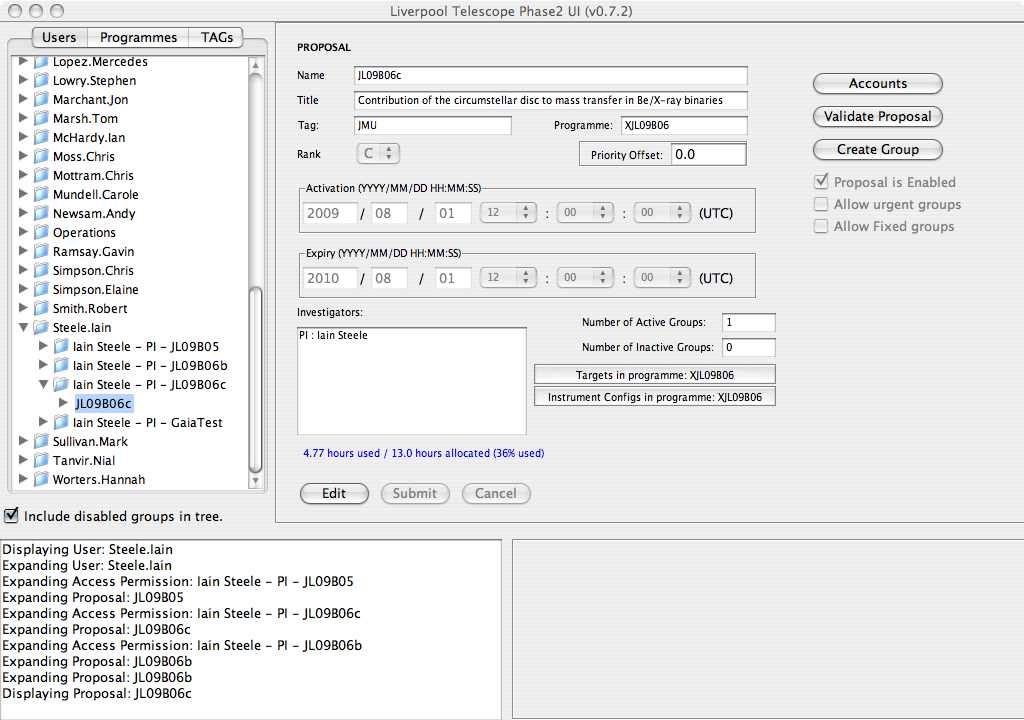
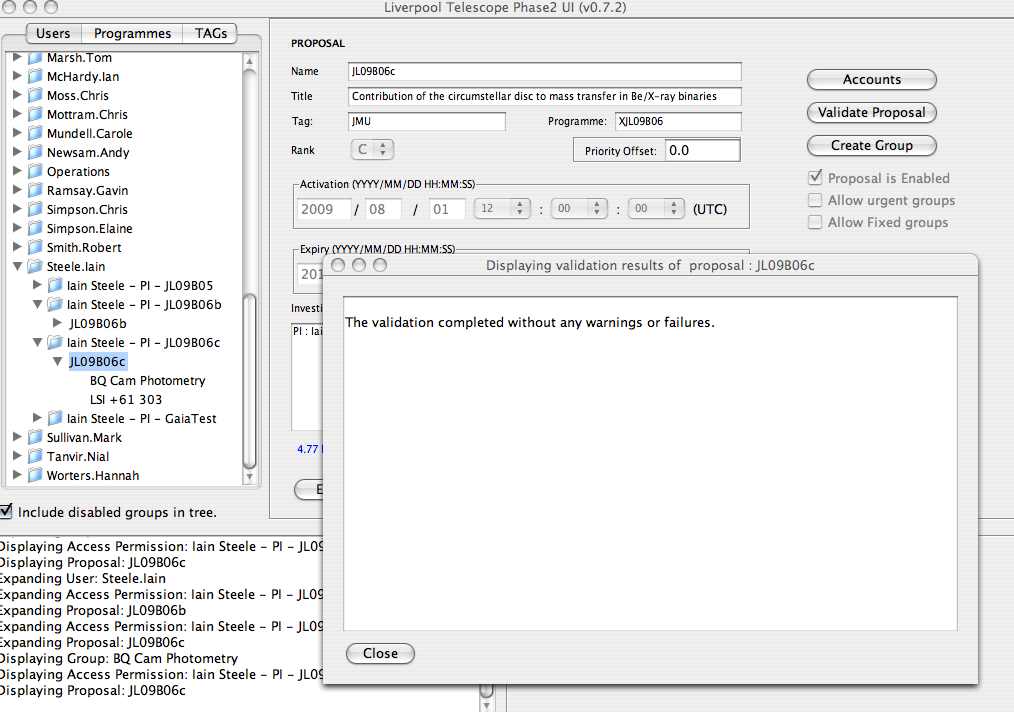
In the left hand panel expand out the tree under your username by clicking on the folder icon. You will see a list of PI/Proposal pairs. Expand out a PI/Proposal pair by clicking on the small triangle and you will see the proposal ID. Clicking on this will bring up the proposal information screen. Check the activation and expiry date of the proposal are as you expect. This screen allows you to access the targets and instrument configurations in the programme associated with a proposal (a programme is a group of related proposals):
 (Click image to enlarge)
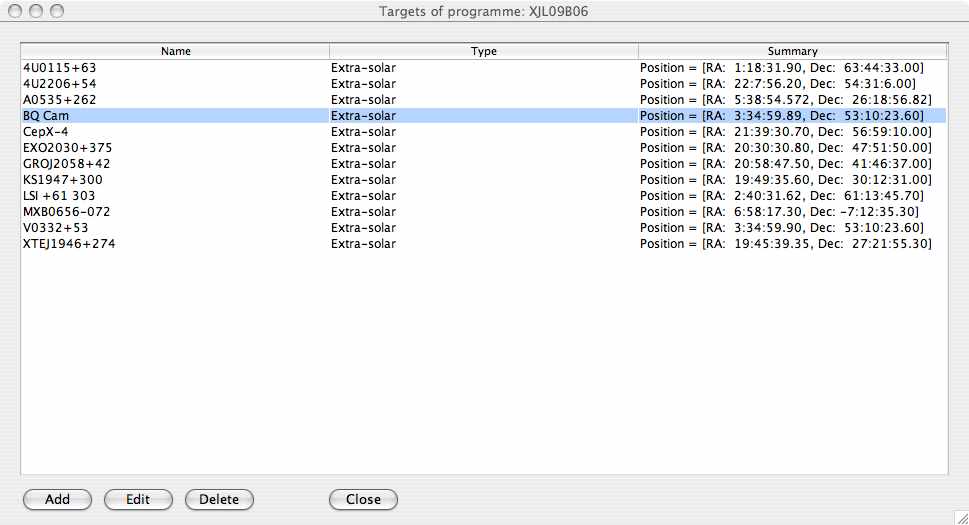
Adding targets
On the proposal information screen click on the "Targets in programme" button. This will open a window showing a list of targets (if any) so far added to the programme:
 (Click image to enlarge)
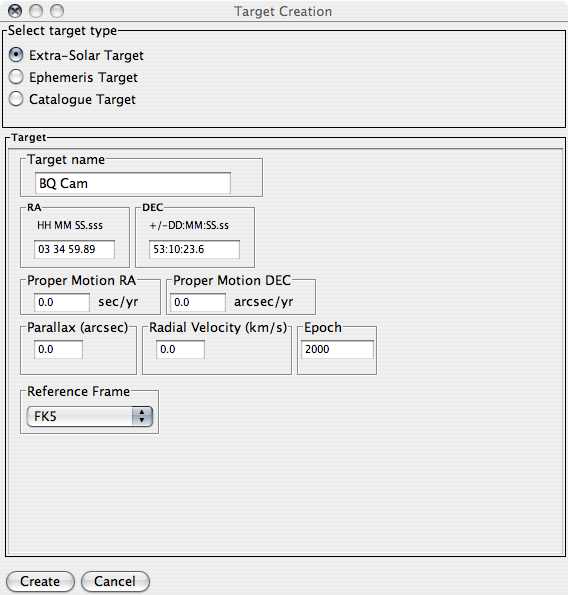
Click "Add" to add a new target. This will bring up a window allowing you to select the type of target you wish to add. Select Extra-Solar Target. The bottom half of the window will allow you to type in a name and co-ordinates of an object (in this case BQ Cam at 03:34:59.90 +53:10:23.6 J2000):
 (Click image to enlarge)
Click "Create" to add the new target to the target list:
 (Click to enlarge)
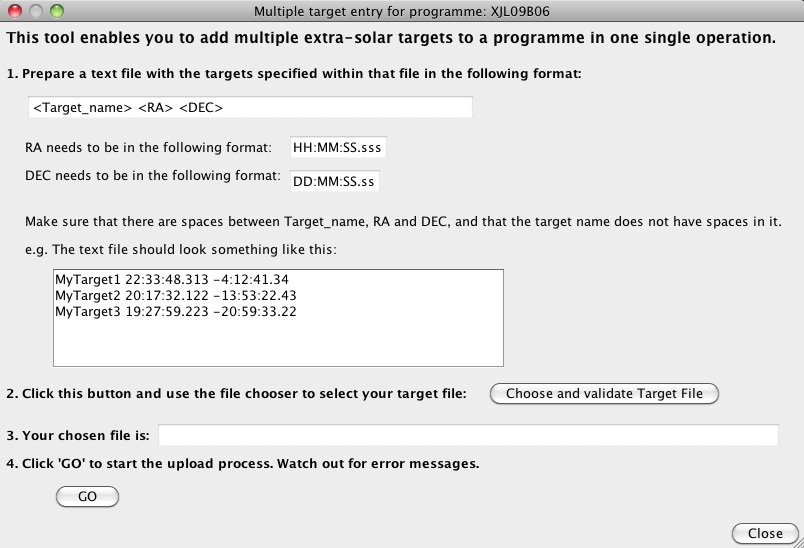
Multiple Target Entry Tool
Since version 1.6.4 of the Phase 2 UI, a button has been available that facilitates the entry of multiple targets from a text file. Click the "Add multiple Extra-Solar Targets" button to access this feature. The format of the text file is explained in the dialog that appears:
 (Click to enlarge)
To use the dialog, press the "Choose and validate Target File", after selecting the file in the file chooser that appears, the file will be validated to make sure it is in the correct format. After completing that process, click "GO", and the targets within the text file will be imported into the programme's target list.
Once back at the target list, Click "Close" to exit. You will now be returned to the proposal information screen:
(Click to enlarge)
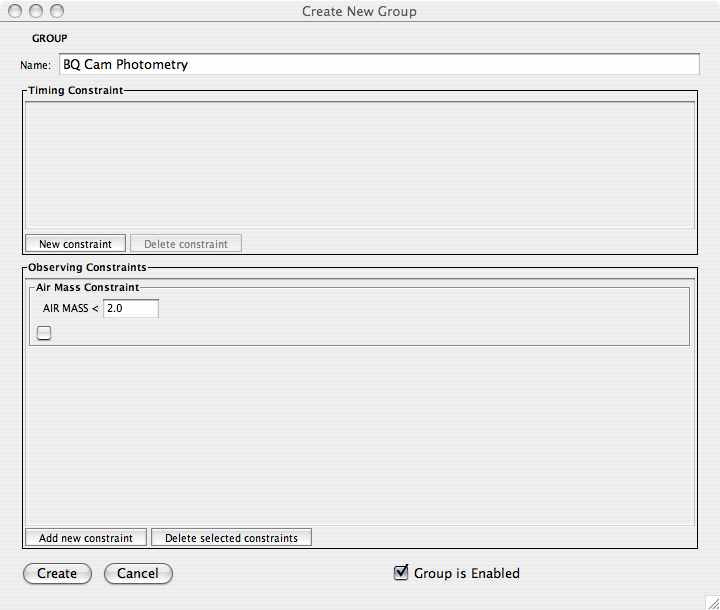
Creating groups
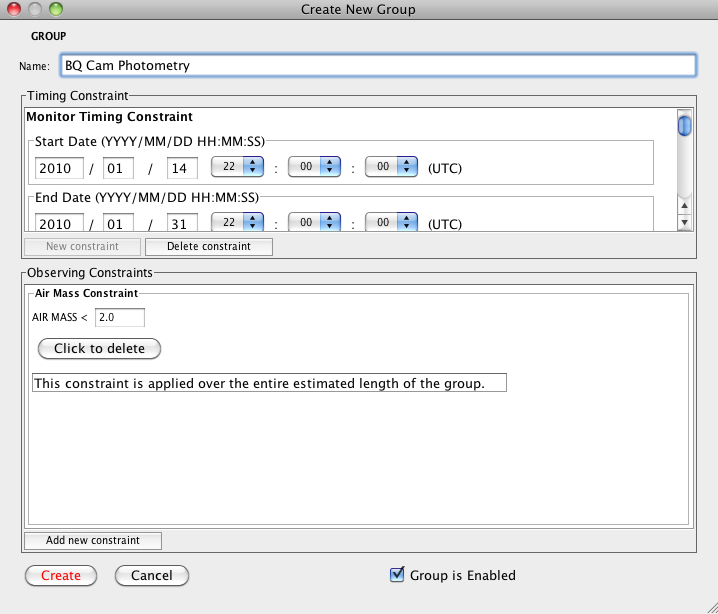
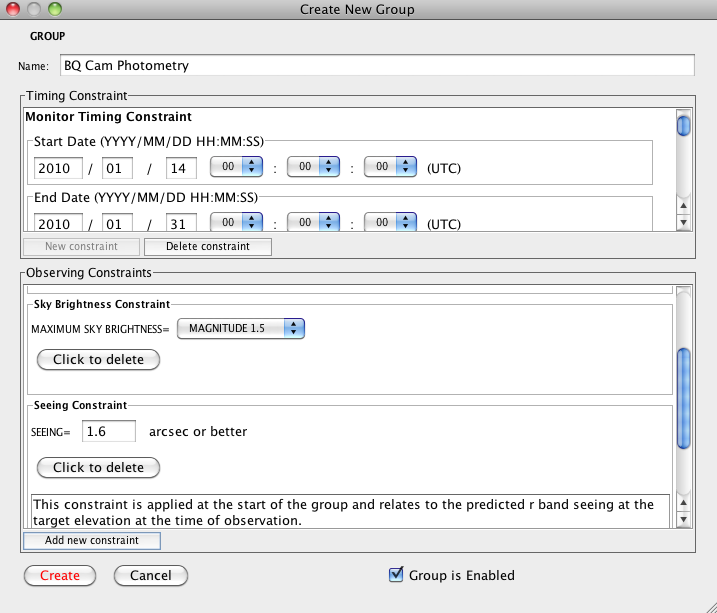
Click "Create Group". The Create New Group screen will open. We will name the new group "BQ Cam Photometry". A Group consists of a single timing constraint, optional observing constraints (some defaults will be set up already for you - these can be edited if necessary) and a single observation sequence (which may include multiple targets):
 (Click image to enlarge)
Timing constraints
In the Timing Constraint panel, select "New Constraint". This allows a number of different types of timing constraint to be added. In this case we will do a monitor group with a 24 hour period (i.e. nightly monitoring). Enter the start and end date, the monitor period and the window (which defines when within the monitor period an observation may take place). In this case we select a long window period as we do not care when during an individual night the observation is made (see below).
Note: You can enter the period and window timings using either the milliseconds window, or by filling in the "DDD HH MM SS mS" windows. Filling in one set of foields will automatically populate the other (e.g. entering "86400000" in the millisecionds window will cause "1" to appear in the DDD window, and vice versa).
 (Click image to enlarge)
Click "Create" to add the timing constraint to the group. The entered parameters can also be edited on this page:
 (Click image to enlarge)
Observing constraints
We will now add some more observing constraints to the group. In particular we will add a sky brightness constraint, saying that we want the sky to be no more than 1.5 mag brighter than "best dark sky" conditions.
 (Click image to enlarge)
We have also added a seeing constraint:
 (Click image to enlarge)
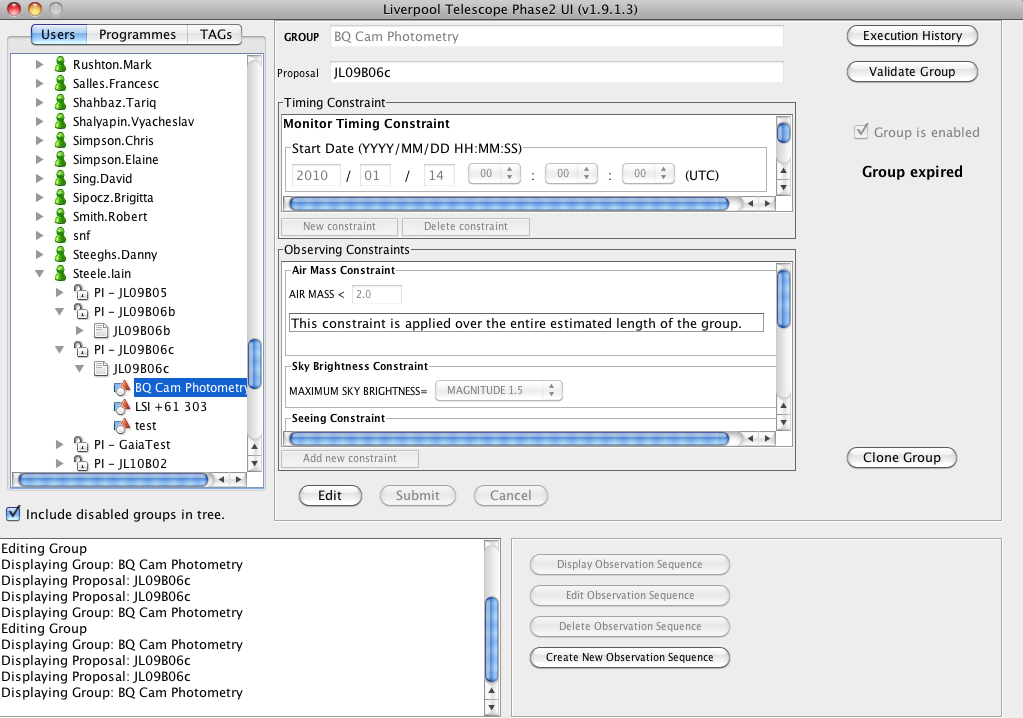
Once "Create" is selected on the Create New Group page, the tree on
the left hand side on the main Phase2 UI window will have the new
group added to it. Note the group names also have the group symbol ( ![]() ) next to them. Clicking on the Group name in the tree will show
the Group information page. The constraints are available for
editing:
) next to them. Clicking on the Group name in the tree will show
the Group information page. The constraints are available for
editing:
 (Click to enlarge)
Creating an observation sequence
We will now add an observation sequence to the group. Click on the "Create New Observation Sequence" button. This will open a window allowing you to select from using simplified wizards to construct your observations or the detailed sequence builder. The use of the wizards will normally be sufficient for most observations. In general use of the general sequence builder is only necessary for sequences with multiple targets within a single observing sequence which is not recommended unless absolutely necessary. It is better in most cases to create two separate groups. Select the Wizard for Multicolour photometry:

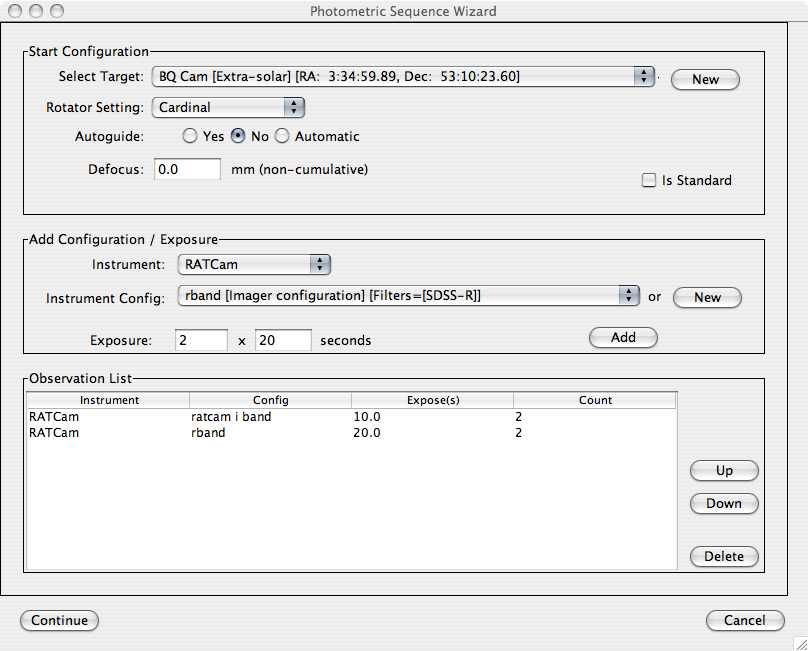
Click "Continue". The Photometric Sequence Wizard will now open. Select the target (BQ Cam) from the drop down list at the top of the screen. In general the Rotator setting should be left to Cardinal/Automatic (ensuing the array sides are aligned N-S) unless you have a special requirement. If you are anticipating using exposures longer than around 120 seconds select either autoguider YES (in which case the observation sequence will be aborted if a guide star can not be found) or Automatic (in which case an attempt will be made to use the autoguider but if it fails unguided observations will be carried out anyway). In this case we have selected NO as the exposure times will be short. Defocus should be left to 0.0 unless you have a specific reason to defocus the telescope. (The system automatically corrects for temperature and filter thickness changes so these do not need to be entered here.):
 (Click to enlarge)
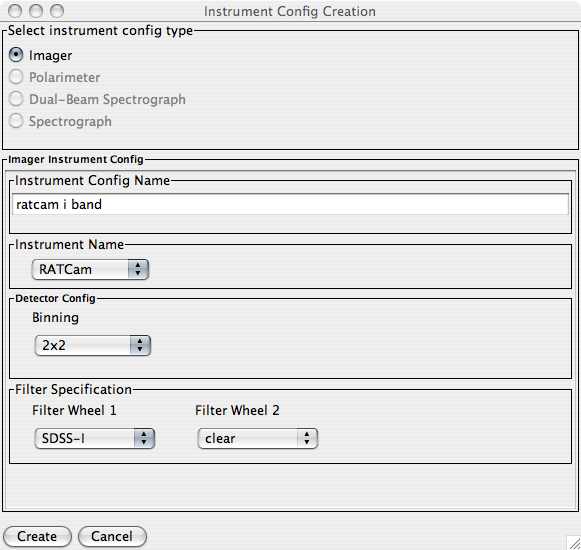
We now need to set up the instrument configurations we wish to observe with. Once set up these configurations will be available to all observation sequences within your programme. Click the "New" button next to the "Instrument Config" selector to open the "Instrument Config Creation" screen. We will create a simple Imager config. This must be given a name, and on selecting the Instrument Name the appropriate options for that instrument will be presented. In this case we will use RATCam with 2x2 binning (the usual option), the SDSS-I filter in wheel number one and filter wheel number two clear:
 (Click to enlarge)
Clicking "Create" on the Instrument Config Creation screen returns us to the Photometric Sequence Wizard screen. We can now select our new ratcam i band config and "Add" 2x10 second exposures with this config. Repeating the process we can also add 2x20 second r band exposures. The "Up" and "Down" button allow rearrangement of the observing sequence:
 (Click to enlarge)
Clicking "Continue" on the Photometric Sequence Wizard will display the actual sequence as submitted to the observation database at the telescope corresponding to the inputs you have made to the wizard:
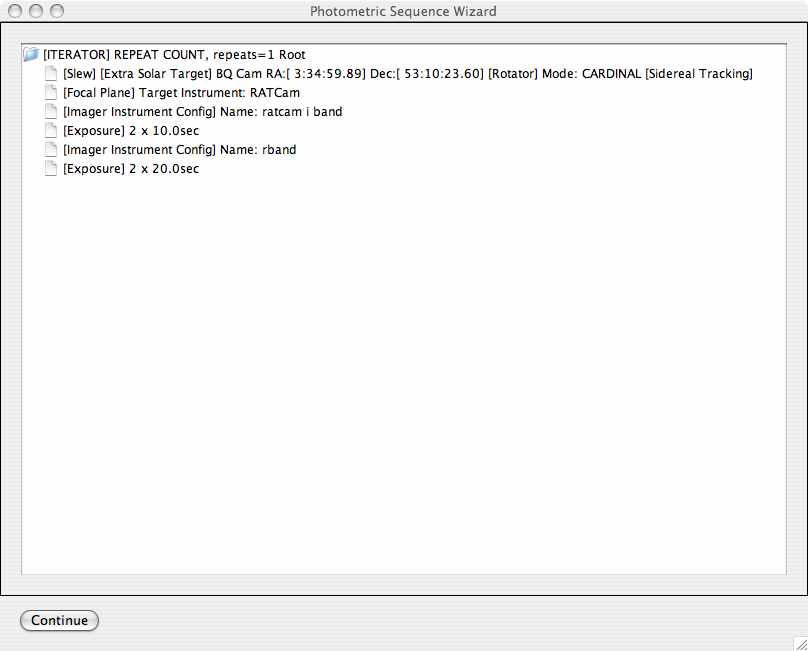 (Click to enlarge)
Clicking "Continue" will return you to the Group Info screen:
 (Click to enlarge)
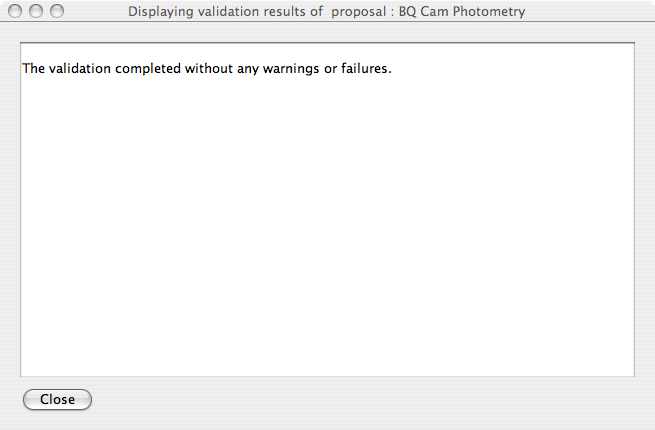
We should now validate the group by clicking the "Validate Group" button:
 (Click to enlarge)
And finally we should navigate in the tree back to the Proposal screen and Validate the entire proposal:
 (Click to enlarge)
The group has now been entered and we can exit the Phase2UI by closing the main Phase2GUI window or the quit option on the Menu.
A second tutorial is available covering advanced use of the general sequence builder instead of the simplified wizards.
Further instructions and definitions of the editable quantities are available in the main phase2UI documentation.