Phase2 UI: Ephemeris Table Input
This page tells you how to input ephemeris tables into the Phase 2 UI and what formats they should take. Although ephemeris tables can be generated by any method, we use the tables produced by JPL HORIZONS (JPLH) in our examples further down the page.
Required Ephemeris Format
The phase 2 UI requires ephemeris data in this format (comma or whitespace delimited):
(|--date--| time |--RA--| |--DEC--| dRA dDEC)
where date & time are in UT, and:
- RA = Right Ascension (J2000)
- DEC = Declination (always with sign) (J2000)
- dRA = RA rate of change in arcsec/hour
- dDEC = DEC rate of change in arcsec/hour
Note also that:
- RA & DEC must be topocentric coordinates for the specified time at the LT site location.
- dRA & dDEC are currently not used by the robotic control system, it derives a rate by interpolating the positions. However the rates must currently be specified.
The Phase2UI accepts either comma or whitespace delimited ephemerides:
2009-Nov-04 21:00, , ,04 32 01.37,+24 55 28.3, 2077.870, 525.5907
2009-Nov-04 21:15, , ,04 32 39.10,+24 57 39.9, 2028.686, 522.1528
2009-Nov-04 21:30, , ,04 33 15.94,+24 59 50.4, 1979.719, 517.3850
2009-Nov-04 21:45, , ,04 33 51.89,+25 01 59.5, 1931.170, 511.2841
2009-Nov-04 21:00 04 32 01.37 +24 55 28.3 2077.870 525.5907
2009-Nov-04 21:15 04 32 39.10 +24 57 39.9 2028.686 522.1528
2009-Nov-04 21:30 04 33 15.94 +24 59 50.4 1979.719 517.3850
2009-Nov-04 21:45 04 33 51.89 +25 01 59.5 1931.170 511.2841
Note the extra columns 2 & 3 in the CSV data. These columns sometimes contain sun and moon presence indicators, but at other times are blank as in this example. They are always output by JPLH. If you select whitespace output these indicators will need to be manually edited out. However, their intermittent presence makes this task monotonous and time-consuming, and for this reason we strongly advise users to always select CSV format if at all possible.
Using JPL Horizons' Web Interface
The JPL Horizons system has a variety of interfaces that can be used. The example here is based on the web interface at https://ssd.jpl.nasa.gov/horizons/app.html#/.
The following summarizes the options to select on the web interface to ensure the output table is in the correct format for the RCS.
- Ephemeris type — set to "Observer Table"
- Select Target body
- Observer location — enter "J13" in the search box to specify the LT
- Time specification — set start & stop times, and time step. We've found for asteroids and comets (not on close approach) a time step of 5-10 mins is adequate.
- Select Table Settings
- set the "preset observer quantities selection" to "None" at first to erase the default settings
- select "1. Astrometric RA, Dec" and "3. Rates RA,Dec" only
- In the "Additional table settings" section, leave the defaults as they are and select the tick box for "CSV format" near the bottom of the page
When finished editing the settings they should look something like this -
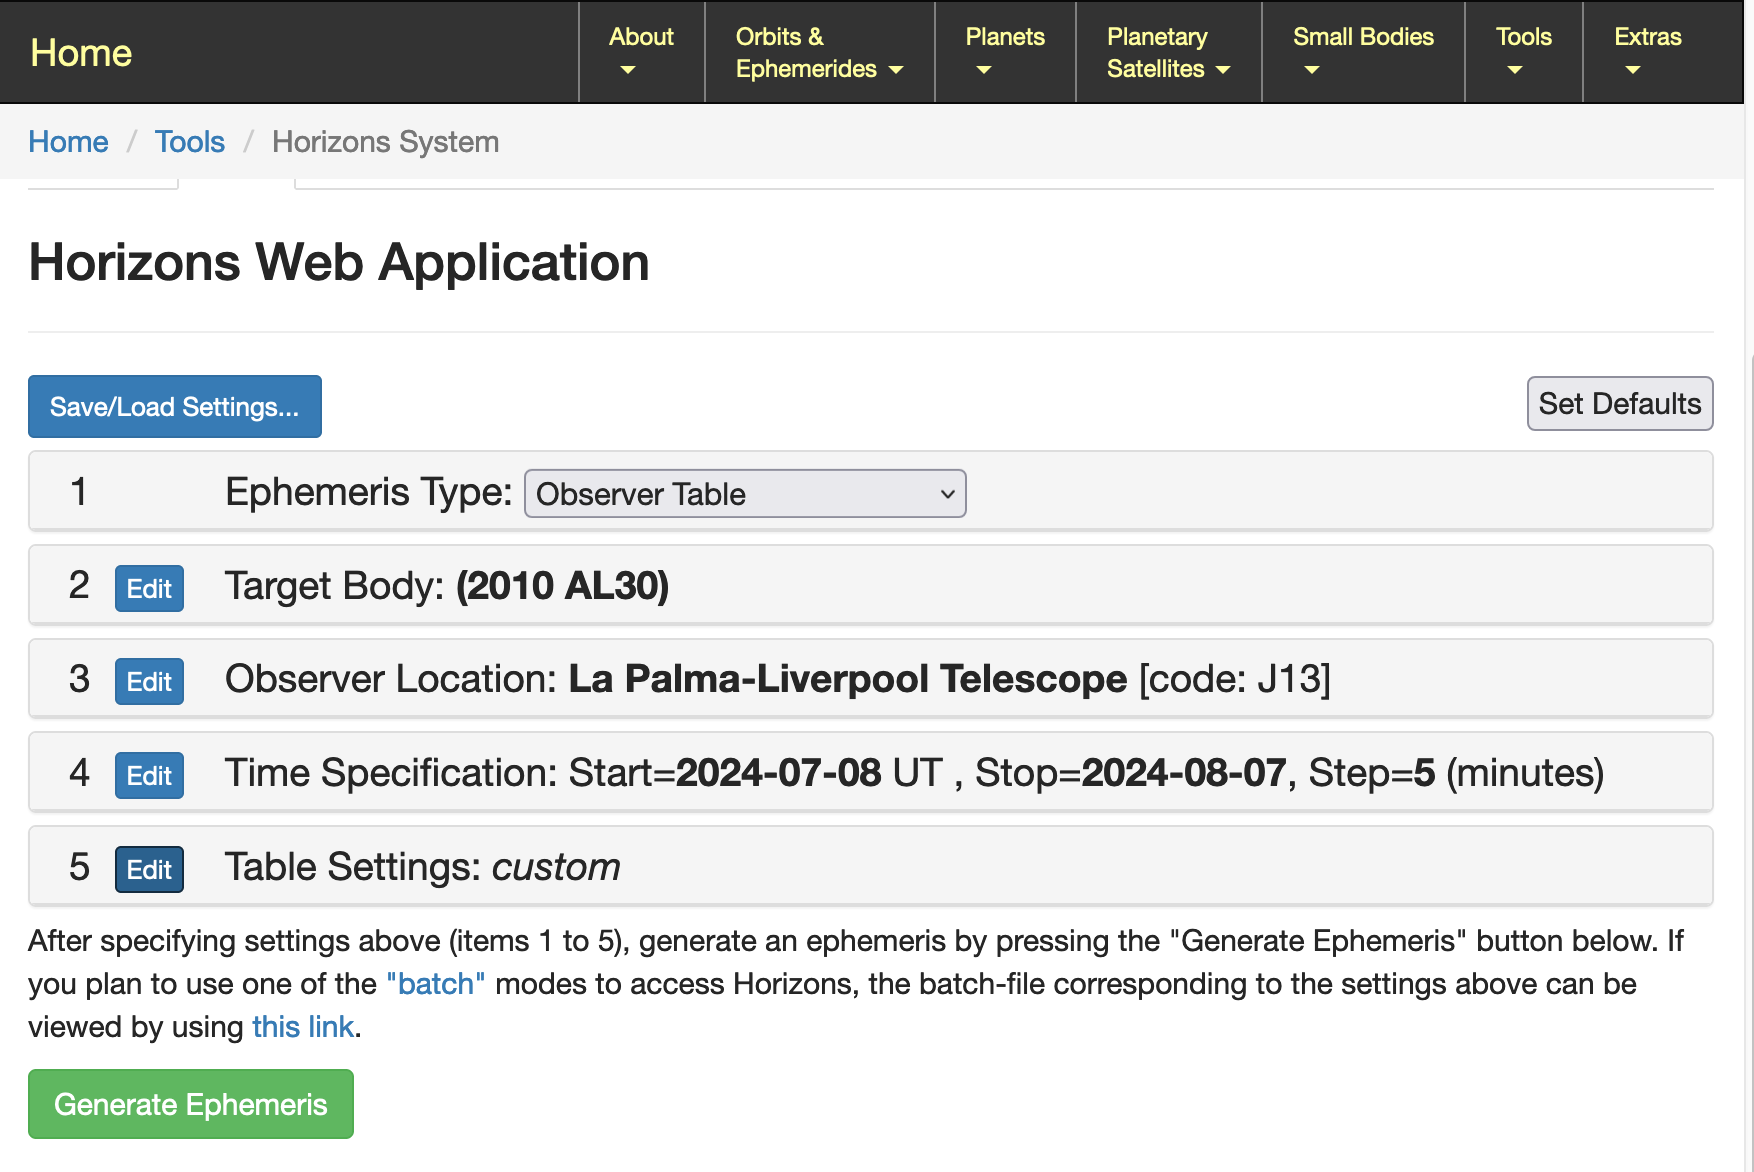
Example JPL Horizons config
Then click "Generate Ephemeris" and download the output to your machine.
Entering ephemeris into Phase2UI
To enter an ephemeris object in the phase2UI,
- select your proposal in left hand pane
- click on "Targets in Programme" to bring up the target list window
- click "Add target" to bring up the target creation window
- click on the "Ephemeris target" radio button, and in the "Target" pane that appears, enter a target name and click on "New target" to bring up the "Create ephemeris target" window.
- select "Comma Separated" or "Space separated" to suit the type of ephemeris you have generated, then copy & paste the ephemeris into the text entry pane.
- ensure only the values are pasted, don't include any comments and column headers.
- click on "Submit", the "create ephemeris target" window should disappear
- back in the "target creation" window, click on "create" - the window should disappear and a popup should appear saying "Target successfully created" - click "OK" and the popup should disappear.
- In the target list window your new target should appear in the list after 5-10 seconds, but it may take longer if your link to La Palma is slow.
- click "close" in the target list window to close it and return to the main Phase2UI window.
More on the JPL Horizons "Time Step" setting
The RCS tracks ephemeris objects by interpolating linearly between consecutive positions. While 5-10 mins is usually acceptable, some thought should be given to the time step to just ensure that:
- it's not too large, so that the target's non-sidereal path approximates a smooth curve as much as is feasible
- it's not too small, so that:
- there are not too many positions, so the ephemeris file isn't larger than it needs to be
- two or more consecutive RA and/or Dec values for slow targets are not numerically the same, leading to RCS confusion and tracking errors. If this happens, the easiest solution is usually to select "extra precision" in the table settings which should ensure the values are different.
Non-CSV format
If building a table by hand it is probably easier to use the non-CSV format. Note that Horizons can also generate a non-CSV table but if you choose to do this you must manually edit out the LUNAR and SOLAR alphabetic flags which sometimes appear in the column between the time and RA.
Using Microsoft Windows
If you are using a Windows machine, then For the Display/Output selection, we recommend using the "download/save" option. This will download a text file containing the ephemerides directly from the web-server. This file can then be opened with a text editor, and the required section copied and pasted into the text area. We recommend using Notepad to open this file (rather than, for instance Wordpad), due to the way line-breaks are handled differently between the applications.